Evernote is a powerful tool for many things related to our personal and professional life. But, also, it is powerful if you use Evernote for innovation purposes.
Through the last five years, I have had many struggles finding the right way and place of this tool in my professional life aside from my private life. Many trials and errors, bring me to the systems and processes that I cannot replace today in everyday work.
Also, I base my consulting work on this tool. One of the first things I propose to my clients is to install Evernote and start using it to put in place my advice. In such a way my clients use Evernote not only about our consulting project, but also it is integrated into their core business processes.
The results were amazing when we look at their achievements. They improve results in productivity, improvements, innovation, customers’ growth, income, and profitability. Because this tool becomes an integral part of my services, two years ago I have decided to develop processes, procedures, and instructions to help my clients to put in place Evernote in their everyday work. In such a way, when we sign an agreement about consulting services I send them this package. So, we can avoid all introductory and preparatory activities.
Now, after two years of polishing and improving the first version of this package, I have decided to share it as a part of Insider’s membership. So, you can start making a difference in doing business. I will start with Evernote for innovation as something important for all types of business.
All topics contain all action steps you will need to take, and screenshots, gifs, and videos to support you in the implementation of the ideas. Additionally, you will have access to process maps and to-do lists for each topic.
Let’s start doing things.
1. What You Can Expect From This Article
Innovation is an important thing for all businesses, and probably yours because you are part of this journey to use the tool.
My first goal with this post is to help you and support you in increasing your own and your business’s innovation potential. What do I mean by increasing innovation potential?
- First, to start innovating in your company continuously in a systematic way.
- Second, to bring as much as possible useful innovation in the shortest possible time.
- Third, use Evernote to support you in the first two goals.
With the help of Evernote, I will explain the basic principles related to innovation and how practically you can use Evernote to make your company more innovative business.
So, the next question is what you will get with this post?
In this post, I will cover some basic things related to Evernote as an introduction and the first necessary steps you will need to take.
2. Creating Evernote Account
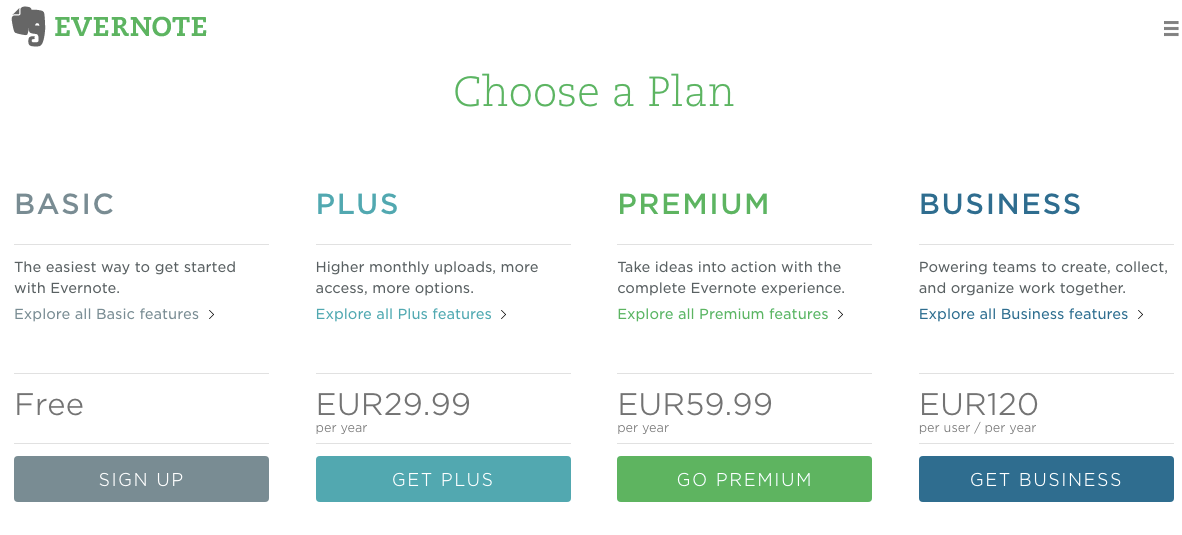
There are three personal and one business plan as possible accounts that you can have in Evernote:
- Basic account. This is the basic account that probably will do the work for you if you are the beginner. But, for some of the features for which we will talk more in the next parts, you will need to upgrade to some other versions. With this account, you can clip from everywhere on the web, share and discuss inside Evernote and sync across two devices. With the basic account, you will get 60MB of new uploads per month.
- Plus account. With this plan, you will get some extra features like offline access to notes, to add the passcode lock on mobile apps, and one of the best features ability to send email directly as a note to your Evernote account to achieve inbox zero. With this feature, you will get an email account for Evernote, and whenever you send email to that account, the content of the email will become your note in Evernote. We will cover these things related to emails into Evernote more in the next part of this posts related to collecting data with Evernote. With Plus account, you will get 1GB monthly storage.
- Premium account. With this version you will get all the features in Evernote like searching office documents, presentation mode, see content related to your notes and so on. With a Premium account, you will get 10GB monthly storage of new notes. You can see what we will use as features related to our primary goal to start using Evernote to help you in increasing your innovation potential.
- Business account. This is a business account and probably the best solution if you want to use Evernote in your business as the main productivity app between your team members. With this account you will get all the individual power of Evernote Premium, plus added a team and admin features to get more done.
Now, let’s start with creating Evernote for an innovation account.
Related: Best Meeting Minutes Software Solutions for Your Company
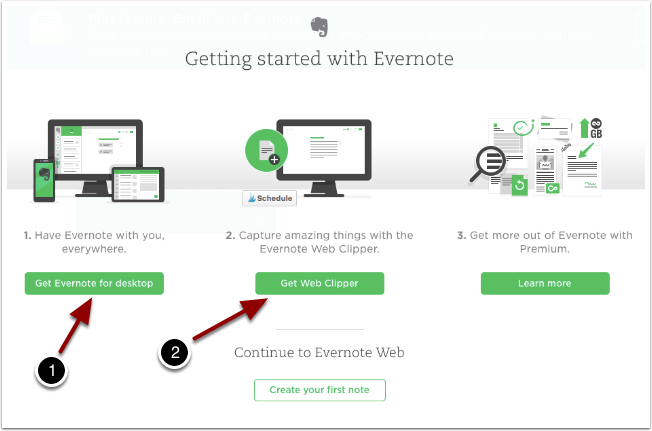
1. Go to Evernote Website
Go to the Evernote website and fill out the form (email and password). Then, you can click the button “related to the plan you want to use. If you are a beginner, start with the basic plan.
2. Get Evernote Desktop App and Web Clipper
After you click the “SignUp” button, you can download the Evernote desktop application, and when you are already here, install their web clipper.
3. Installing Evernote Web Clipper
After you install Evernote Web Clipper, you will need to have some icon like this in your browser, based on the type of browser you are using.

4. Install Mobile Version of Evernote
Go to your app store based on the mobile phone you are using and find the Evernote app, then install it on your mobile phone. Repeat this step for all your mobile devices including tablets. This step will enable you to sync all data collected and stored in your Evernote account.

3. What is Evernote
Now, when you already have installed Evernote on all your devices, you are ready to start using this powerful tool on an everyday basis. My first experience with Evernote 5 years ago was finished at this level (installing apps on all devices without using them). This experience doesn’t change in the next several tryings until I finally found the usability and place of Evernote in my everyday private and professional life. This post is only part of the ways I am using Evernote.
Evernote is a cross-platform, freemium app designed for note-taking, organizing, and archiving. As you probably already see on their home page, Evernote is presented as a workspace for everything you’ll do to get things done. It is:
- One workspace to write from short ideas to long researches, no matter what form your writing takes it will keep you focused on moving those ideas from inspiration, to ideas, drafts to finished tasks.
- One workspace to collect everything that matters for your private and professional life clipping web articles, capture handwritten notes, and snap photos to keep the physical and digital details of your projects with you always.
- One workspace for discussion, connecting your work with the people who can help you to work through communication, collaboration, and sharing things in real-time with anyone in the world without ever leaving Evernote.
- One workspace to present on meetings by presenting your work as it evolves without the need to build slides, it is just one click, and your notes are transformed into a beautiful screen-friendly layout.
But, what is important is to see Evernote not as an application or tool, but as something that contains the most important data and information for your work and your life. Using cross-platform features enables you to collect, find, and use different information on the web, mobile, and desktop versions of the application. Sync functionality and cloud-based computing enable you when you make a change on any device, to be synced through the Evernote Web services and the same info lives everywhere on all devices where you have installed the app. So, we will look at Evernote as your digital database, not as the tool, or application because without data and information the tool will not be worth it for you.
4. Evernote’s Anatomy
Now, we will continue by covering basic things related to Evernote so that you will prepare yourself for all practical things related to innovation for your business.
Before we start with the practical work related to preparing your Evernote for the innovation purpose, we need to look at the specific terminology that I will use in the next parts of this course.
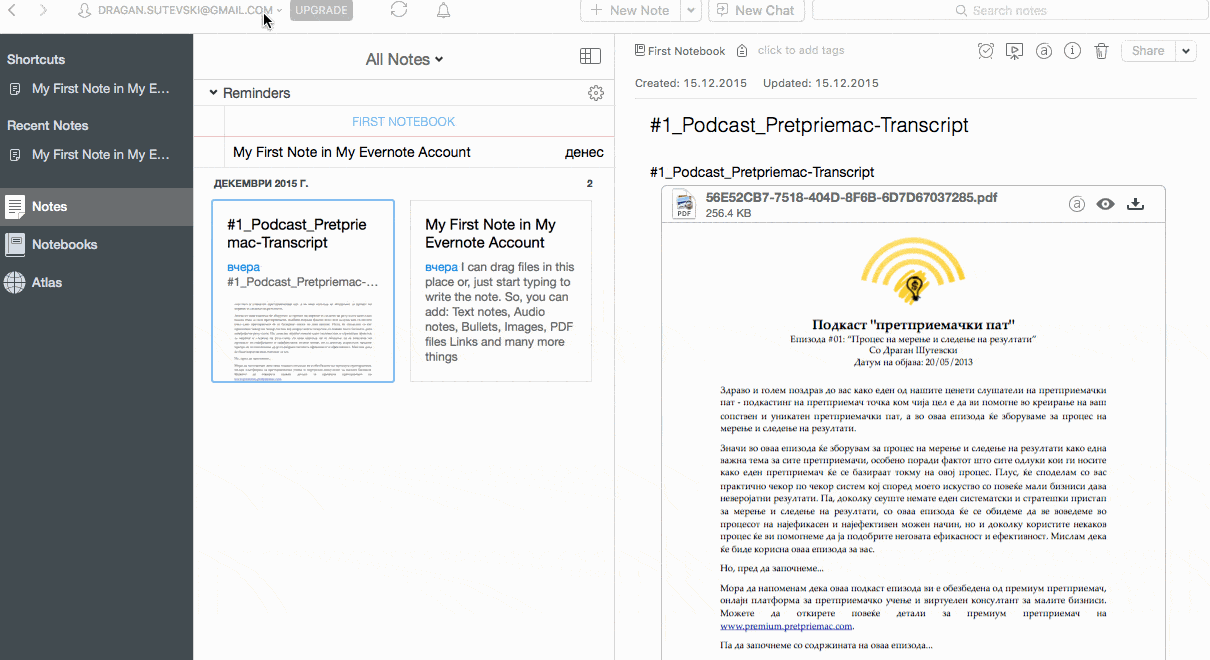
- Note. A note is a single item stored in your Evernote account as a text note, PDF document, Word document, an image, audio note, any other file on your computer, or any combination of earlier mentioned.
- Notebook. A notebook is a container used for logically storing notes. For example, you might have a notebook called “Innovation Processes” or “Cooking Recipes,” or “Business Processes.”
- Stack. A stack is another named container, not for notes, but for notebooks. Stacks allow you an extra level of organization of your notes and notebooks. For example, your Innovation Stack might contain, “Innovation Ideas,” “Innovation Processes,” “Innovation Knowledge Base,” and “Current Innovation Projects” notebooks.
- Tag. A tag is a short descriptive piece of text applied to a note to additionally explain the main topic of a note that can be used to identify it later. Each note may have many tags (or none at all).
- Sync. Sync or synchronization allows keeping an up-to-date copy of your entire database with notes (except the parts you tell it not to) somewhere on the Internet. The synchronization happens automatically at timed intervals that you can configure, or manually clicking on the Sync button.
- Saved Search. The saved search is a search query that has been saved with a custom name and can be executed anytime with a single click.
- Reminder. A reminder is a note’s extra attribute that will cause the note to appear at the top of any list of notes in which it appears. Reminders can also have an optional notification sent at a date and time set by the user.
- Clipping. Clipping is an act of collecting content from a source (your web browser or another application on your desktop or mobile device) and adding it to your Evernote account.
Now, let’s start learning about the basics of Evernote.
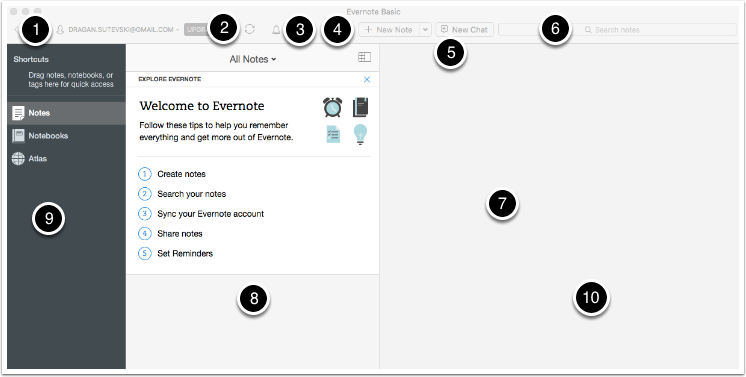
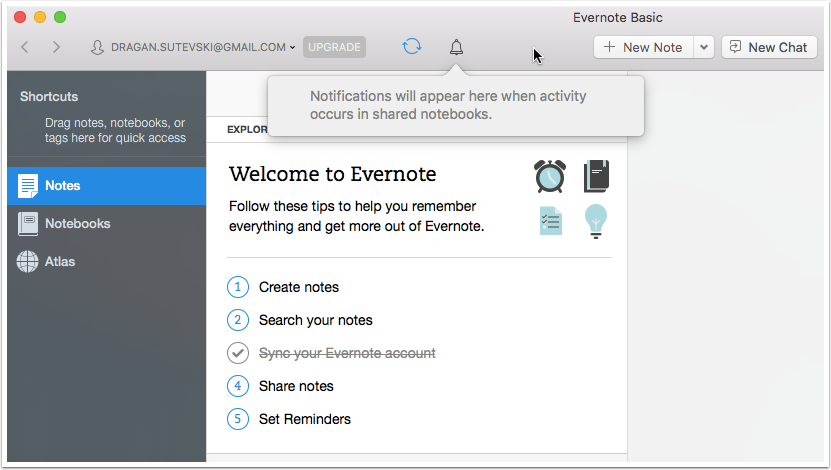
1. Open Your Desktop Evernote Application
Opening your Evernote Desktop App, you will first see these things:
- Your Account
- Sync Button
- Notification
- New Note Button
- New Chat Button
- Search Notes
- Note Content Area
- Notes Area
- Shortcuts
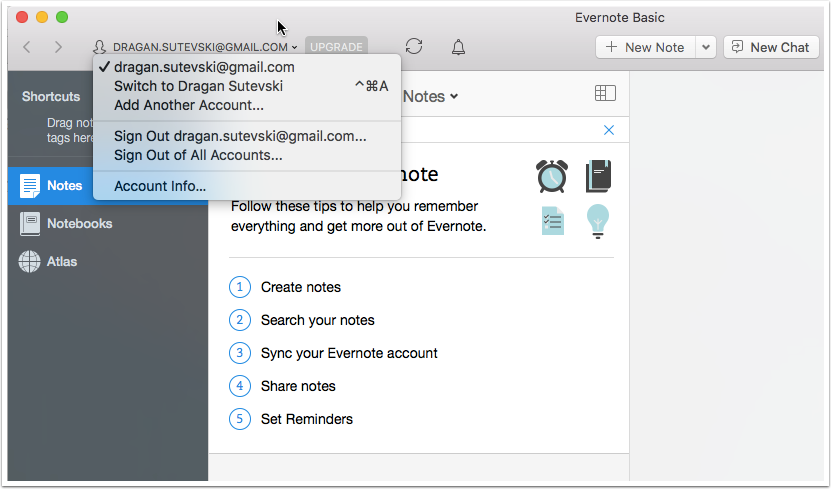
2. Click on Your Account
When you click on your Evernote account you can do the following things:
- Switch to another account if you have several accounts.
- You can add another account.
- You can sign out from your accounts
- And you can see your account information.
Check all options to see what you can do more.
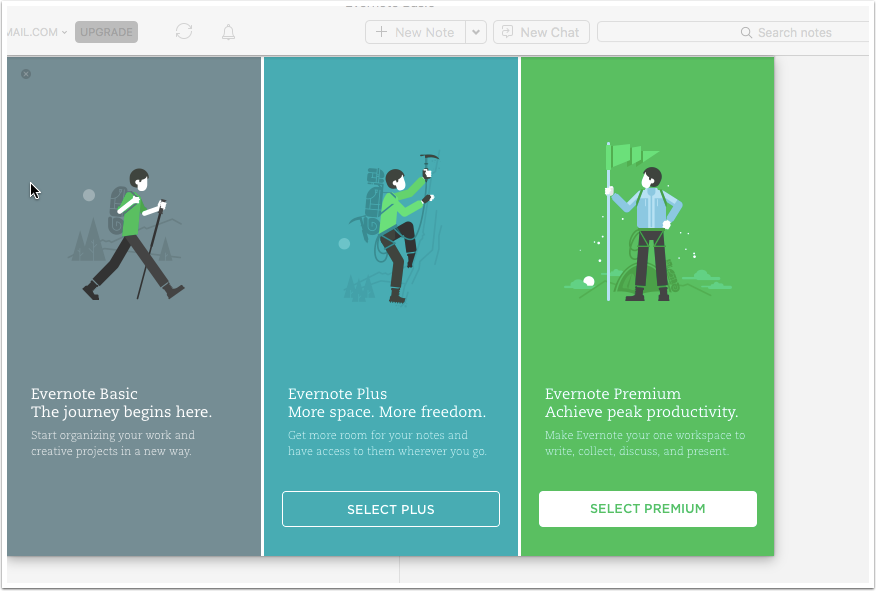
3. Click on Upgrade
When you click the “Upgrade” button, you can quickly and easily select other account types (Plus and Premium).
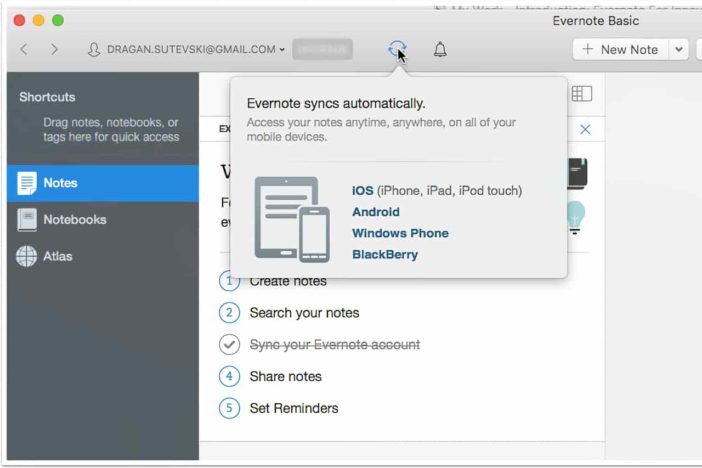
4. Click on Sync Button
When you click on Sync Button all notes collected from other devices, and notes collected on your Desktop will sync with the cloud, so they will become accessible on all your devices when you search for them, from anywhere and anytime.
5. Click on Notification Button
When you click on the “Notification” button, you will see when there are some activities on shared notebooks with other persons.
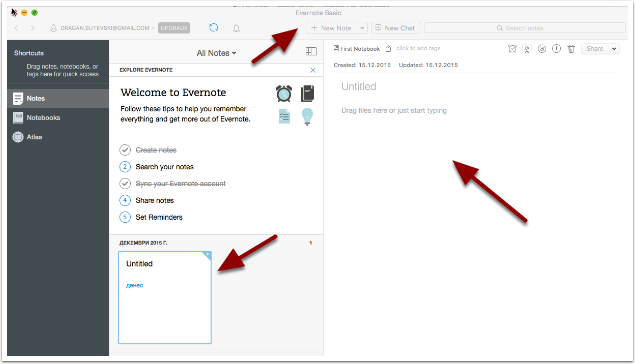
6. Create a New Note
When you click the “New Note” button, you can create a new note in your Evernote account. Your new note will appear in the Note Content Area where you can write the notes and Notes Area where you can navigate through different notes.
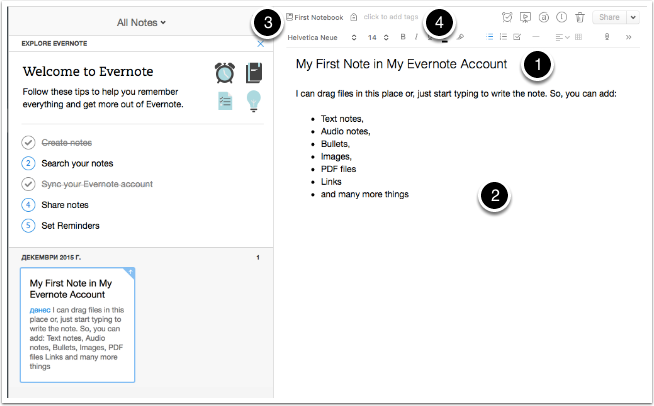
7. The Anatomy of a Note
The anatomy of a note in Evernote is presented by:
- Note Title
- Note Content
- Select Notebook
- Add Tags
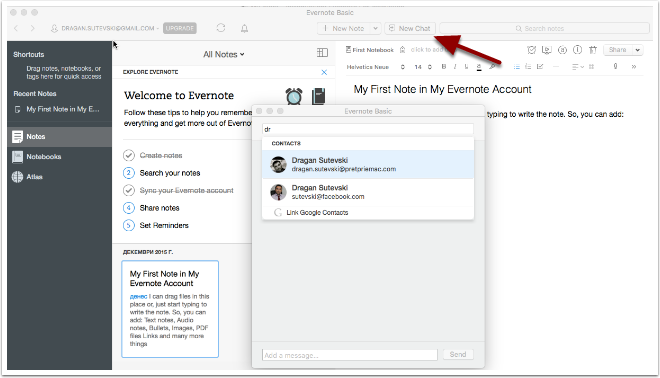
8. Click on the New Chat Button
When you click on the “New Chat” button, you can select from the lists other person’s accounts with whom you can chat inside Evernote.
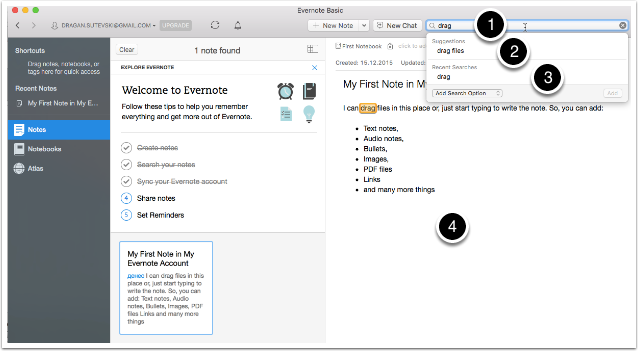
9. Searching Inside Evernote
When you click in the Search area and start typing, you can search through all notes inside your Evernote account. So, you can:
- Type and search
- Use Evernote’s suggestions
- See recent searches
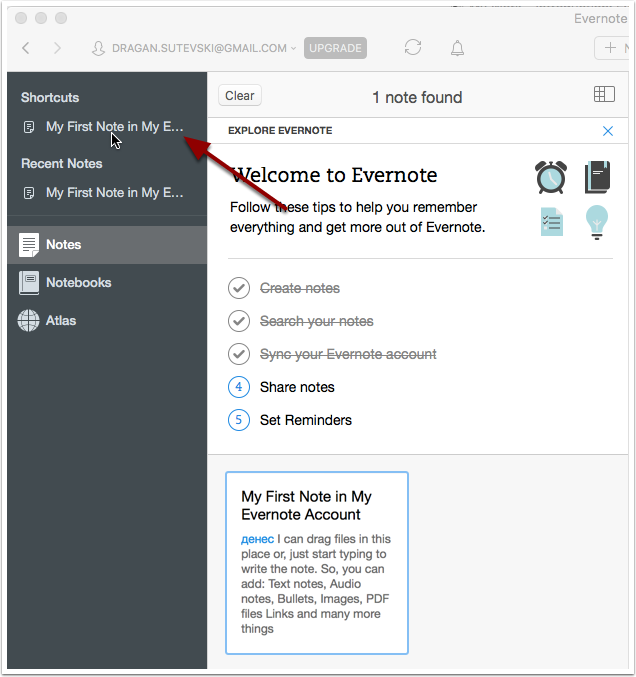
10. Create Shortcuts
You can create shortcuts for quick access to the different notes, notebooks, and tags dragging them inside the shortcut area.
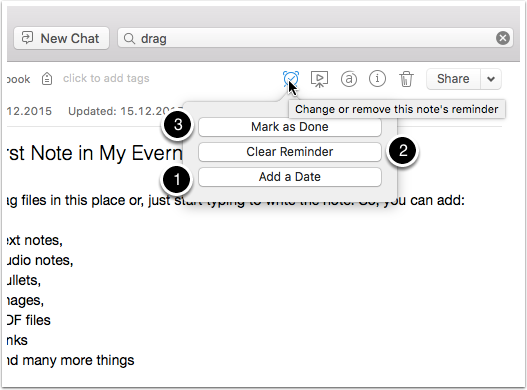
11. Set Reminders
You can additionally use reminders if you click on a “Reminder” button, which enables you to add data and time about the activity you will need to take with the selected note. So, with reminders you can:
- Add date and time related to specific activity with a specific note, so these notes will be the first you will see in your Notes area.
- You can clear reminders if you think you don’t need them.
- You can mark reminders as done for the specific note.
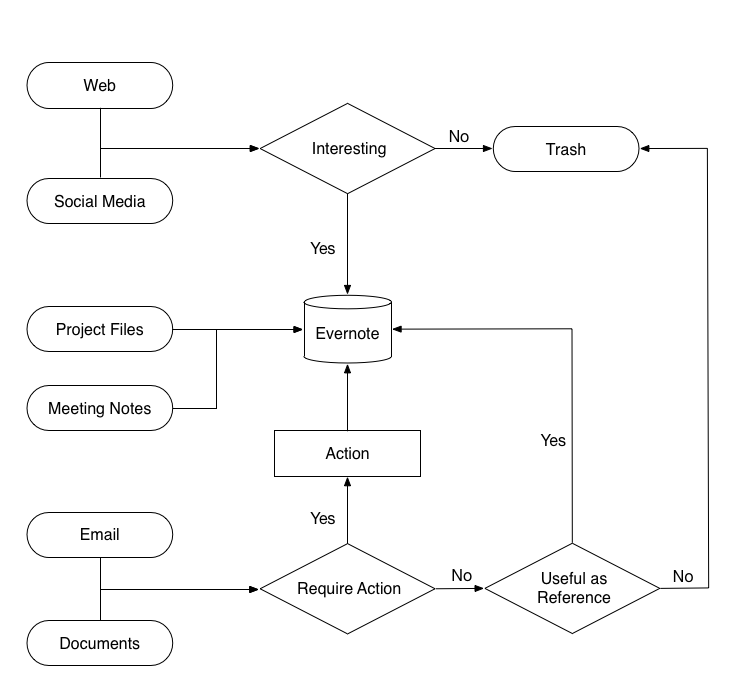
4. Collecting Data
Collecting data and storing them in your Evernote account is one of the most important things you will need to do. It is not only about collecting, but it is more about putting the collection of information as something normal in your everyday life.
When it comes to Evernote, and an easy way to add things to the account related to collecting data is one of the biggest advantages of the application. Currently, your main goal is to collect as many as possible things inside your account.
I have already covered the manual creation of a new note through the Evernote application, so now the focus will be on other ways you can use it to collect different types of information. Let’s look at each of the ways you can add stuff in greater detail.
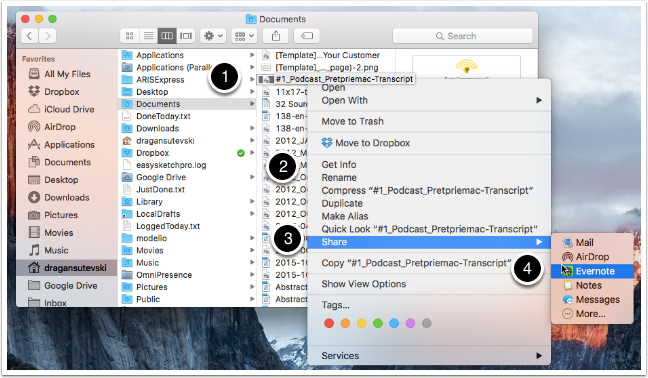
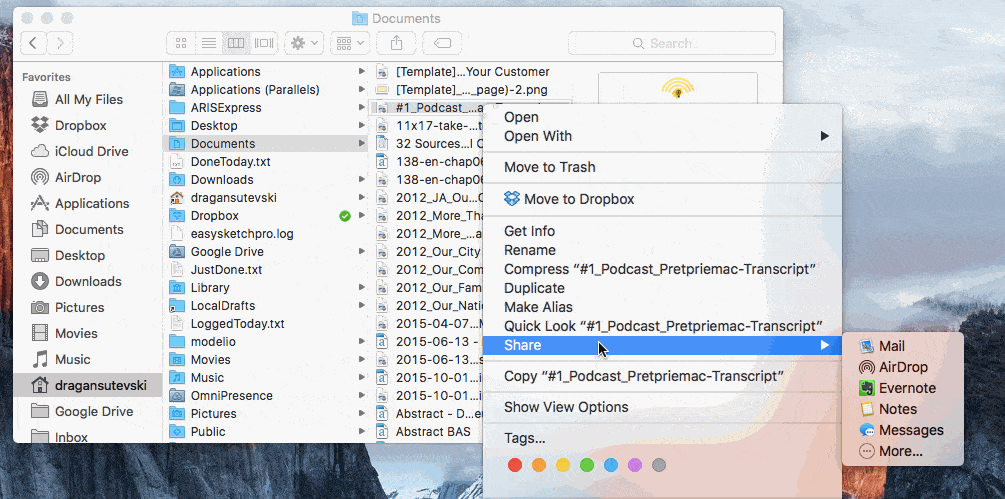
1. Adding Files From Your Computer
Aside from using the system clipper (Copy and Paste a file or text inside Evernote’s note), you can also
- Find the file you want to add into Evernote
- Right-click on the file
- Select Share
- Chose Evernote
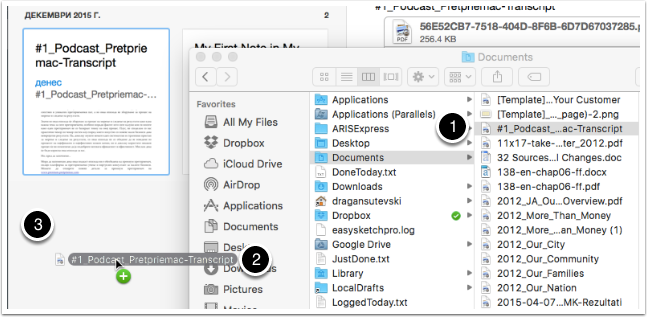
2. Drag and Drop Files Inside Evernote Note
You can also drag & drop the file inside Notes Area to create a new note that will contain the dragged file. You will need to:
- Find the file
- Drag the file
- Drop the file inside Notes in your Evernote account
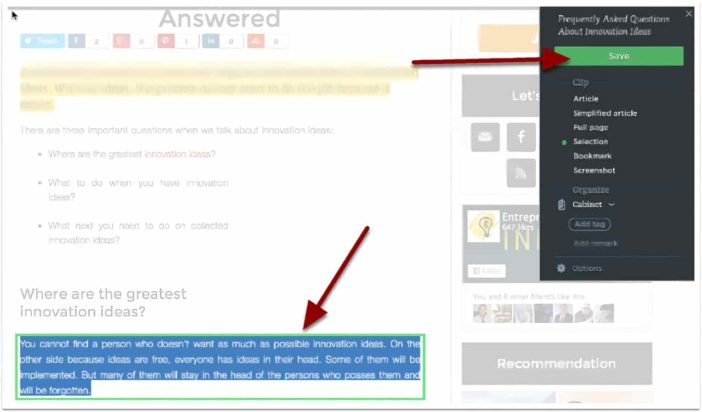
3. Clipping From Your Web Browser – Clip Article
After you find an interesting article on the web and you want to remember it for later or to use it as a knowledge base inside your Evernote account, you can use Evernote’s web clipper.
- Click on the Evernote’s Web Clipper in extensions bar on your browser
- Select the type of clipping
- Select the notebook where you want to clip the article (Optional)
- Add tag (Optional)
- Add remark (Optional)
4. Clipping From Your Web Browser – Article
When you select Article as a type of clipping, you will clip only the content area of the article without other parts on the website as sidebars.
If you’re reading a blog post that has a bunch of advertisements, navigation elements, and other unneeded stuff for clipping, the Evernote Web Clipper will only highlight the text of the article.

5. Clipping From Your Web Browser – Simplified Article
Selecting “Simplified article” from the clipping type you will clip a more readable article without other formatting details inside the article. My recommendation is to use a simplified article whenever it is possible.
6. Clipping From Your Web Browser – Clip Selection
If you highlight any part of the web article before clicking the web clipper, and you choose “Selection” the selected text will be clipped in your Evernote account.
7. Clipping From Your Web Browser – Web Clipper Other Options
- Full page—Just as it says, if you click this option, you’re going to get the entire page inside your Evernote account.
- Bookmark – Article will be clipped only as a bookmark, or image, and the beginning sentences from the article.
- Screenshot – If you select this option you can clip screenshot from the part of the web page you chose.
8. When You Clip the Article
When web clipper finishes clipping, you will get information that the article is clipped and additionally Evernote will try to show you some related notes that you already have inside your Evernote account.
9. Emailing to Evernote Email – Find Your Evernote Email
To find your Evernote’s email, you will need:
- To click on your Evernote account as a first and select “Account Info…”
- Click on “More Account Settings” that will bring you to the web-based application and your account setting.
- In Account Summary find “Email Notes to”
- Copy given email address
This email address is an address that you can use when you want to send an email as a note in your Evernote account.
10. Send Email to Evernote Email – Forwarding Email to Evernote’s Email
You can forward emails that you have received from anyone directly to your Evernote account making a new note.
- Find an email message that you want to record as Evernote’s note.
- Click the “Forward” button
- Paste your Evernote’s email that you have copied before
- Click the “Send” button
Your email will become your note in the default notebook inside your Evernote account. Same steps you can use when you create a new email.

Evernote Mobile App
When it comes to mobile, in the same way, you can add content from your mobile browser. Here are some things you will need to do to clip web pages on mobile devices.
1. Enabling Evernote
To enable Evernote as a sharing possibility in Safari on iOS, you will need to
- Click on the “Sharing” button
- Click on the “More” button
- Enable Evernote
- Click “Done.”
Now, when you find the content you want to clip in your Evernote account, you can take the action steps described below.
2. Clipping From the Web on Mobile
If you want to clip a particular article from the web on your mobile, you can just add it to your Evernote account.
- Find web page you want to clip
- Click the “Sharing” button
- Click Evernote app
3. Save Web Article on Mobile
When you click the “Save,” your article will be saved in your Evernote account.
To-Do List – Evernote for innovation (Introduction)
- download Evernote app (desktop and mobile)
- create Evernote account
- go through action steps described in this post
- start clipping as much as possible information from different devices inside your Evernote account.